Saturday, March 26, 2011

Why I Started Making Stuff


My daughter was recently invited to a birthday party with a unique, fun theme. The girls dressed in their fancy clothing and arrived at the birthday girl's home. A limosine arrived and the girls got a ride to the mall to go window shopping. Afterwards they traveled back to the birthday girl's house for dinner and cake, and on their way out the door they received glittery purses bursting with lip gloss, nail polish and other little girly gifts. Cool, right? Yes.

The thing that has been bothering me about that day is the message behind the party-- how fabulous it is to consume. Not that that isn't fun. I like to go to the mall as much as the next girl...well, actually, maybe not as much as the next girl. But I do like to make the occasional shopping trip and covet all the cute outfits and fabulous accessories. It is satisfying to walk the wide halls, a heft on my arm from glossy bags filled with crinkly paper newness. But when I come out I always feel full and deprived at the same time. Fat and yet lusting for more. Overwhelmed and yet yearning for...something.

I've mentioned before that I believe children need to see the people they love creating things. We live in a culture where we value consumption, and devalue creation. This is something we've all heard before, so often that it becomes a cliche. But it is still true.

Last year my oldest began making sculptures out of her Babybel cheese wax, so I stopped buying those annoyingly overpriced little processed chunks. She wasn't eating her lunch at school because she was spending that time making cunning little red kitties and goldfish. The fact that she was creating things out of garbage made me do some hard thinking and I began to realize that our family was getting bogged down in the everyday consumption grind. It's another cliche, right? The mom has fun with the kids by taking them places and buying things. The parents drive the kids to soccer practice while the kids play on their electronic gaming systems. The family communicates through the internet even when they are sitting in the same room. We weren't quite to that point, but I thought we were getting close and I believed that we needed to search for something real. That could take the form of hiking and camping, concentrationg on religion, family meetings and game nights, community service, combinations and permutations of these things and more. There were so many options. I finally realized one day, as I was tossing into the garbage a tiny garden my daughter had planted in the found lid from a soda bottle, that I had lost my habit of creation. And I wanted it back.

In high school and college I used to make things. And write things. And create. My friends were all painters, photographers and poets. My husband's friends were all partiers--the fun, cool crowd, the consumers. When we first started dating he told me, "My friends destruct; your friends construct." I loved that comment. It sounded neat and tidy, a way to draw a line between the separate worlds the two of us seemed to inhabit. Looking back, and having drifted myself somewhat over the imaginary line, I believe that was a false line to draw. Everyone has the germ for construction and destruction within themselves.

I decided to take a page from my oldest's book and look at the world through less wasteful eyes. I bought a sewing machine, some crochet hooks, and yarn. (I started my efforts to consume less by buying? Ironic.) I called my sister and sisters-in-law and declared that all of our Christmas gifts would be homemade. Some agreed more readily than others. But they all agreed. And my kids and I went on a two month spree of crafting. We learned new techniques. I learned to crochet and made amigurumi dolls for the youngest nieces. My son taught himself origami, while his little sister practiced sewing on buttons and painting. My oldest changed her medium from cheese wax to felt. With the help of a fabulous book by Nellie Pailloux, called Felties, she created some of the cutest little felt creatures you can imagine. Including the one at the top of this post. We spent a lot of time together, not connected by the thin strand of a Zelda battle wi-fi connection, but on the same side of the room, threading needles and smoothing fabric.

The kids still send each other virtual gifts on Webkinz, and I still find myself throwing miniature scultures in the gabage. Afterall, I don't have much use for a tiny mobile made out of broken pencils, string pulled from a t-shirt hem, and magic markered pop tabs. But when I throw them away now, I am less likely to sigh with frustration. Instead, I take the time to look at them first, and enjoy for a moment the transient beauty of small creations.

Monday, March 14, 2011

Gifts for the gardener who has everything...


Gardener's Gift Box

Spring means flowers. Where I grew up, spring is loud and obvious. Crocuses push their heads up through crusty snow; daffodils light up dark corners; dead looking trees send out plumes of bright green leaves. When I moved to Arizona, I was quick to say that it had only two seasons: hot and hotter. It took me ten years to appreciate the subtle signs of an Arizona spring. The cactus are putting out little grey nubs, many of which will bloom only briefly and only at night. The desert trees, which have not quite lost their leaves all year, put out some light green, bright green, baby leaves. The flowering bushes are flowering, yellow and purple.

My childhood conditioned me to want to plant things in the spring. I grew up in a place where you just toss the seeds over your shoulder and come back a while later to a surfeit of zucchini, and enough tomatoes to fill a pantry with jars and jars of sauce. A friend of mine back in the Midwest has a compost pile that each year gives her volunteer pumpkins, tomatoes and gourd squash.

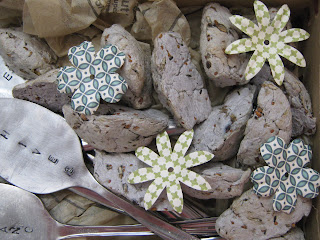
Here in the desert, my garden struggles. Maybe I don't give it enough water. I always feel guilty dousing plants with water in the desert; we should be saving water, right? I am sending this awesome Gardener's Gift Box off to Oregon, where I can imagine, guilt-free, the flowers growing. In the box are flattened spoon garden markers and seed bombs.


Smooshed Spoon Garden Markers

My favorite corner of the garden is the herb section. I love to rub the plants in my hands and then smell the rosemary, dill, thyme or oregano on my fingers. Mint, basil, sage. Aaah! I made these smooshed spoon garden markers for the herb section of the garden. I smashed the spoons, then borrowed my tool-loving neighbor's tool marking stamps to write the names of the herbs.


Hummingbird and Butterfly 'Seed Bombs'

So have you heard of guerrilla gardening? It's like guerrilla art, only with flowers. Plant-loving people throw seeds in abandoned corners of public places, or sneak out at night and attach planters in the most unlikely of places. One of the guerrilla gardeners' secret weapons is the seed bomb, a paper blob filled with seeds, which gets thrown in vacant lots. When it rains, the paper absorbs the water and gives the seeds a safe place to germinate. With any luck, there will be a bright spot where once there was rubbish. And this is the perfect time of year for seed bombs.

I used a nationally marketed wildflower seed pack for these 'bombs'. The last thing I'd want to do is gift someone with an invasive species of plant. I shredded newspaper, placed it in the food processor with a generous amount of water and processed it into a pulp, then used a wooden spoon to stir in the seeds. I squeezed/strained the pulp in a flour sack towel, and formed the resulting goop into triangular lumps. (I wanted to use a heart-shaped ice cube tray, but it was ruined and discarded in a Valentine crayon making project.) It took one night for the bombs to dry completely. I would think that if you live in a more humid climate, it would take a little longer. Be warned, if you try this--the newspaper ink stains everything it touches, but it does come off with a bit of detergent and elbow grease.

I think that this project would make a wonderful Easter Basket, hostess gift or Mother's Day present. I hope some of you will give it a try--and let me know how it turns out!


Saturday, March 12, 2011

Upcycling--trendy word or old school philosophy?


Upcycled bracelet

The upcycling trend is intriguing. I love the idea of taking something old and discarded, then turning it into something new--something that might be even nicer than the old thing was when it was new. What a great concept. The arts and crafts that are produced with this philosophy are sometimes breathtaking. But we are fooling ourselves if we think upcycling is new. It is a new word (a great word!) for an old idea.

My grandmother was born in the United States as the oldest daughter of Hungarian immigrants. She lived through the depression and helped her parents support the family by working as a courier for a dental supply company. When I was growing up and went to visit her, she would make us what she called "American Chop Suey". She could feed twenty people for the price of two pounds of pasta, a can of tomato sauce and a pound of beef.

We loved to hear Nagymama tell us stories of her life during the depression. For her entire life, she lived frugally and saved everything. Nowadays we watch shows about hoarders, and that is the image we have of someone who saves everything. But that was not Nagymama.

She had a box of rubber bands, black with ink from the newspapers they arrived with, but the box was tidy and stored in its proper spot. She had stacks of sour cream containers, cleaned and neatly arranged on top of the refrigerator. She used those sour cream containers to store food. She cut them up and used them in projects around the house, and she even made crafts out of them.  She reduced, reused and recycled long before it became a catchphrase.

Nagymama was not the only one who lived this way. Her whole generation was like this. I'm sure that people who are in their nineties today are still like that. It reminds me of a book called Joseph had a Little Overcoat. My son owned this gorgeous picture book with a wonderful story about  a man whose overcoat wore out, so he made a jacket. And when the jacket wore out, he made a vest. The vest turned into a scarf, then a hankie and so on until all that remained of the original overcoat was a single button. It is an illustration of a way of life most of us hardly remember.

This week I honored thrifty grandmothers and joined trendy upcyclers by making this gorgeous and comfy wool bracelet. Here's what I did. I visited the local thrift store, where I found an old wool sweater for $.99. I brought the sweater home and washed it in hot water and soap. (In order not to waste, I put it in with jeans. The copious amounts of lint that the sweater shed in the wash came right off the jeans when they went into the drier.) After several loads, the sweater had felted. Then I cut a long strip from the sweater, tapering the strip from about 2.5" at one side to about 1.5" on the other side. I washed the strip a final time. Now I had the form for the bracelet.

I raided my oldest daughter's craft stash for some wool roving scraps and Czech glass beads left over from her projects. I took the scraps of wool roving and rolled 'snakes' with them, then needle felted the snakes onto the base in random spirals. I knew I wanted the bracelet to be 7.5", so I marked that distance and hammered in a snap closure on each end. My youngest daughter had an old turquoise shirt that she had outgrown, and which was really too worn out to pass on to anyone else. I cut the t-shirt into strips and rolled the strips into roses, then sewed the roses onto the bracelet. I hid the snaps under the roses. Finally, I used beads to bring out some more detail. The final result? An awesome, upcylcled bracelet that cost me about one dollar to make.

I hope Joseph and Nagymama would be proud. I think they would.


Saturday, March 5, 2011

Luck of the Irish...passed on to the neighbors.


In our house, we love Saint Patrick's Day, but we certainly celebrate it with an American slant. We wear green to avoid getting pinched by a leprechaun. We decorate with shamrocks. And we eat our own version of an Irish meal: corned beef and colcannon. Colcannon is one of the easiest, yummiest and least expensive dishes I know of. It is mashed potatoes mixed with boiled cabbage shreds and caramelized onions. You would think that kids would turn their nose up at it, but I am telling you, they love it! Once you have it the first time it goes straight to your comfort foods list.

I'm sure you can find a recipe online, but I like the fact that colcannon doesn't need an actual recipe. All you do is make some mashed potatoes, boil some shredded cabbage in the potato water, caramalize some onions, and then mush it all together. So good!

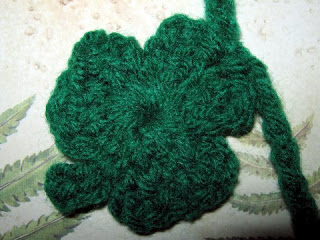
This shamrock garland is one that I made after seeing something similar on an Etsy wishlist. I thought it would be easy to make. And it was. The hardest part was finding kelly green cotton or wool yarn...I didn't. I had to make it from acrylic. I don't like to make things from acrylic yarn because it does a real number on my finger tips. Wool on the other hand, makes my fingers softer. I always think it's because there is lanolin in the wool, though I suppose it could be removed in the yarning process and the softer fingers could be all in my mind.

I made one shamrock garland for a trade and one for our home. Unfortunately, the one in our house didn't last very long. It kind of made our stairwell look like a gallows for a leprechaun, so it found a new home with one of our favorite neighbors, who has a mantel.

I followed a free online pattern for the shamrocks. The garland/string is just a ch20 between each shamrock, then a sc into the middle section of the shamrock.

I'd love to add to our limited repertoire of Saint Patrick's Day traditions. So, please comment below if you have a Saint Patrick's Day tradition that you're willing to share. Thanks!

Thursday, March 3, 2011

Time is never on my side. Tiny amigurumi peas to the rescue.


I am always running from one project to the next. When I am working, I feel guilty that I am not hanging out with the kids. When I am hanging out with the kids, I feel guilty that I am not washing dishes and folding laundry. And when I am doing housework, I feel guilty that I am not spending time with my husband or walking the dog. Sometimes I solve this by combining obligations. ("Come on kids, let's make dinner together!") But I can't exactly bring a basket of laundry to fold at work. And my husband is unlikely to think that "Let's dust the furniture!" would be a fun date.

A friend, who has two children, saw the pictures of the peas I made for my niece and asked for a two-pea version. I can't commit to such a big project right now, but I found some time (when my mind was engaged but my hands were idle) to make a bunch of little peas. Each tiny pea took about the same time to make as a double layered crochet flower. So if you know how long that takes you, these peas should take about the same amount of time.

My daughters snagged the first few peas and pods. I usually let them take the projects that they like--I figure that my kids come first. It is important for children to see people they love actually creating things. As opposed to just consuming things. And I can always make more. I used a scrap of polar fleece to make tiny pods for the peas. With very little time invested, I was able to make my kids (and my friend's kids too) these awesome little peas.

I used a size J hook and worsted weight cotton yarn, but I think you could make a very sweet little key chain if you use a smaller hook and sport weight yarn.

Peas:
Chain 3. Slip stitch to join in ring.
Row 1: 6 sc into ring (6)
Row 2: 2 sc into first ch. Repeat around (12)
Row 3: *sc into first ch, 2sc into next ch* Repeat around. (18)
Rows 4-6: sc into each ch around (18)
Row 7: *sc into first ch, 1 invisible decrease into next two ch (front loops only)* Repeat around. (12)
Add eyes and mouth at this time.
Row 8: 3 invisible decrease. Stuff pea. 3 more invisible decrease. (6)
Continue to decrease until the hole is too small to work. Tie off. Weave in tail and pull closed.

Pod:
Cut a rectangular piece of polar fleece that is 3 1/2" X 4 1/2".
Fold it in half lengthwise, or 'hot dog style' as my kids say. Sew the pod shut using a simple "7" shape on each side. (Mirror image '7' on the first side, regular '7' on the second.) Trim off corners. Flip the pod right side out. There is no need to sew the edges, because this is a quick and easy project. But a blanket stitch in a contrasting green would be pretty cute. You know, if you have extra time on your hands.

Uh-oh! There goes my timer. My youngest gave me ten minutes to finish this entry. Now we are going to go wash the dog...together. (Time with kiddo: Check! Wash the dog: Check!)

Related Posts Plugin for WordPress, Blogger...