Sunday, September 25, 2011

Amigurumi Bumblebee ready for Halloween

This little bumblebee's friend, Bumblebunny, is ready for Halloween. Both of the bees were crocheted in the round and are a quick and fun project for beginner crochet artists. I used a 'g' hook and a lightweight yarn. There are some spots where the filling shows (as you can see in the pictures), so I probably should have used an 'f' hook. When making amigurumi, choose the smallest hook size that you can comfortably crochet with. The final result will be smaller, but there won't be stuffing showing!
                                                         
Bumblebee:

R1: chain 3, join, 6 sc into center (6)
R2: 2sc into each ch around (12)
R3: 2sc, sc around (18)
R4-7: sc around (18)
R8: switch to black yarn. sc around (18)
Place eyes. Sew on mouth. Make sure the joins where you started the black yarn are on on the top of the body. In this way, you will be able to cover the awkward join with the wings. I didn't do this on the first bee (see pictures) and it makes a big difference in making the bee look 'polished'!
R9-11: switch back to yellow yarn. sc around (18)
R12: switch to black yarn. sc around (18)
R13-14: switch to yellow yarn. sc around (18)
R15: sc, decrease around (12)
Stuff.
R16: decrease around (6)
R17: continue to decrease. Normally when you get down to 4-6 chains you stop and weave in the ends to make a round end. In this case, we want a pointy 'stinger' so continue to decrease until the yarn begins to pucker outward and you have only a single ch left. Tie off and weave in, creating stinger.

Wings: (Make 2 in white yarn.)
R1: chain 3, join, 6 sc into center (6)
R2: 2sc into each ch around (12)
R3: 2sc, sc around (18)
Tie off.

Assembly:
Sew the two wings together. Sew them to the top of the body, covering the joins between the yellow and black yarn. For antennae, tie together three pieces of yarn (about five inches long) and braid them together. Use the crochet hook to pull the untied end into the head on one side and then out on the other. Rebraid end, if necessary. Tie off at desired length and trim the excess.

If your bee is a fan of Halloween, like Bumblebunny, make sure to make him a costume! Be creative with this. Over the years, I've had bumblebears and bumblebunnies, but how about making a bumblebutterfly or bumbletiger?

I'd love to hear from you if you use any of my patterns. And I'd really love to see pictures. Thanks for reading!

Thursday, September 22, 2011

An Empty Jewelry Box


Isn't this jewelry box cool? When I was home this summer, I helped my aunt clean the cobwebs from the rafters of her root cellar, and I came upon my uncle's old photography supplies. My aunt gifted a few of the tins to me and I brought them out of the cellar that they'd been resting in for decades. This tin had a gorgeous patina on the outside. I wanted to alter the tin, but I didn't want to lose the texture of the patina, so I painted it with a matte black spray paint. On the inside I used a peacock blue acrylic paint (the recipient is a big fan of peacocks).

I crocheted a peacock feather for the top, and I wish you good luck finding a peacock feather pattern--I couldn't find any! Instead I borrowed an old peacock feather fan from my mom and mimicked the shape and colors as best I could. I used eyelash yarn for the outside round and stem. The stem was a little too goofy, and I thought to cut it off before gluing the feather to the top of the altered tin jewelry box. But just when I was ready to do so, I thought perhaps I should make the feather detachable. I carefully attached Velcro to a circle of felt and glued it to the back of the crocheted feather. Then I glued a matching circle of felt to the top of the box. I wrapped the stem around the edges, to be used later, if detached. The Velcro clings to the felt on the top of the box enough to keep the feather in place, or allows it to be removed. I finished the project up by placing some cool little self-adhesive half beads on the sides and lid.

Looking at the pictures of the empty jewelry box makes me think of the four pieces of jewelry that I wear every day: my nose ring, my wedding ring, a toe ring from my grandmother and a ring on my thumb that I wear to honor my commitment to my husband's family. My jewelry box is empty (well, metaphorically anyway!) because I carry my jewelry with me through the day.

When I was tiny, I remember seeing a picture on the cover of National Geographic magazine of a girl with a nose ring. I thought she was beautiful, and felt drawn to her. I thought, "I wish people here could have that kind of jewelry." This was Ohio in the 1970's. Wheat bread was exotic, whole wheat bread unheard of, so a nose ring was not something I could ever expect to see on the people around me. But I continued to think that the nose ring (and the girl) were beautiful, and remembered the picture long after the magazine had left our orange-shag-carpeted home.

When I was a teenager, things began to change somewhat in my world. I  traveled out of the suburbs and met kids who grew up in urban areas. In Cleveland, my friend's step-mom (a step-mom! How strange and different that seemed) served us an exotic food: vegetarian chimichangas. They tasted like nothing I'd ever eaten before. "What is this delicious herb?"
"It's cilantro," she shrugged.
"I have to tell my mom about this! It's the best thing I ever tasted!" When I went home, my mother told me she knew what cilantro was, but that she hated it. I was perplexed.

In the early nineties, I began college and was earning the money to pay for it. I was on the Ramen Noodle meal plan, living in an apartment with others who had not experienced that particular rung on the socioeconomic ladder. One day, my friends invited me to go to Ann Arbor with them, where they said they knew a guy who had a piercing gun. I could get my nose pierced. I jumped at the chance.

A year later, I headed off to Alaska during summer break to try to get a job on a fishing boat. I found a position working on a floating processor. I remember that the company took us to the ship on a smaller boat and that as everyone strolled around talking and meeting each other, I wandered to the quiet stern and watched the wake pooling out behind us. I was so happy to be in Alaska, in the closest thing to a frontier that I was likely to ever see. I wanted to get away from the chatter and see the water seeming to grow larger as the shore shrank in the distance.

Later, my husband would tell me that that was the first time he saw me. A girl standing alone, with long black hair and a nose ring, staring backwards when others were looking not much of anywhere. I added a wedding ring to my list of every day jewelry a little less than two years later.

Back in the Midwest, my husband and I were living in State College, Pennsylvania while he finished school. My Hungarian grandmother sent me $10 as a birthday gift. I was working as a salad prep/bartender in a local restaurant while we tried to pay rent and out-of-state tuition. Ten dollars was a fortune. I found a tiny ring in one of the eclectic shops along College Avenue and bought it. I put it on my toe and have not taken it off. That summer I showed my grandmother. "Nagymama, look at this toe ring. You gave it to me."

"You're welcome, Dear."

When my husband finished school and began to look for a job, he said that he wanted to travel half way across the world to visit his family for three months. "If I don't do it before I find a job, then I will be working all the time and we'll never get a chance to go back for that much time." It was a wise decision and I will never forget the time I spend in my wonderful in-laws home, eating mangos and learning the language. Before leaving the US, I bought myself a large ring and placed it on my left thumb. I performed a silent ceremony as I put it on, telling myself that the ring represented my marriage to my husband's family. As long as that ring remained on my hand, I would remain committed to them. They are delightful, kind and loving people and I've never once felt like taking that ring off.

While visiting, I got the chance to visit one of the most densely populated cities in the world, to wander a gorgeous, long unsullied beach, and to eat my mom-in-laws cooking. But after only a week or so, my bread-raised soul grew tired of rice and, in the heat, I found I could no longer eat hot rice generously anointed with ghee. So I switched to the local fruit. I ate tiny prickly pineapples that had all the flavor of our large ones condensed into one bite. I had lychees by the bunch. And you know how each summer, you get to eat that one perfect watermelon, the one that tastes so good that you eat watermelons all summer long just trying to get another perfect one? That summer I had perfect watermelon after perfect watermelon. And the mangos!

Mangos were in season and the variety was as wide as the variety of apples I'd eaten each fall in Ohio. (I grew up a mile down the road from an orchard. An extensive orchard.) In my husband's family home, I ate tiny yellow mangos, and medium mangos that were mottled brown on the inside but creamy, sweet and tart on the inside. I ate oversized mangos with a slightly spicy bite to them. My mom-in-law chopped up green mangos and served them with onion and mustard oil. One day my husband's dad came home with two giant mangos the size of watermelons. The flesh was exactly the color that you imagine when someone says mango. It was so delicious, I ate an entire mango on my own. I also slept that summer. A lot. I later found out that mangos contain something that can make you sleepy when you eat too many of them. Looking back, that wonderful summer was like a dream. I slept that summer away, thanks to a glut of mangos.

This morning I woke up thinking about my permanent jewelry, and how each one defines me in some way:
the dreamer who loved nose rings even as a preschooler; the wife who gazes backwards; the granddaughter who misses the people she has lost; and the daughter-in-law, far away but still loving her other family. I enjoy each piece of forever jewelry, and wish you all equally empty (metaphorical!) jewelry boxes.

Friday, September 9, 2011

Who can make stuff?


While working on my teacher certification, I taught for two years in a nationwide child care chain. The turnover rate was enormous because of low pay, long hours and the fact that despite Arizona's already high child to adult ratios, the center did not always manage to have enough employees on hand to keep the classrooms 'at ratio'. But the teacher I worked with and I worked together to make our room an oasis. (As much as we could, under the circumstances.)

Although our budget for posters and craft supplies was very low, there was an abundant supply of construction paper. We used the bulletin boards to full advantage, displaying artwork, lesson plans and educational concepts. When it came time to create new displays, my friend/co-teacher would say, "You'll have to do that part. I can't do it right." But the fact is that I am not enormously skilled as an artist. My drawings look like John Lennon's scribbles. When we created a farm background to display the children's artwork, my construction paper pigs looked like pigs because they were pink and round and had a snout and a curly tail, not because they actually looked like pigs. Seriously, I believe that anyone has the skill to cut out a paper pig. But we don't all have the confidence to do it. So in a way, it was true that she couldn't do it. She couldn't. It was a crisis of confidence though, not skill.

These days, I get to teach art at my children's school. (There is no official Art Program, so parent volunteers go into the classrooms to teach scripted lessons.) The kids light up when they see the art guides walk in with our boxes of paint and paper. They love to create. And they don't worry that they 'can't' do it (well, not until fifth grade or so...) I wonder what we can do to help more people hold onto that desire to create. It's kind of sad that we get hung up on not good enough, instead of embracing the idea that this is what I can do. Why do we reject the fun of craft for fear that it is not art...or art enough?


(Speaking of which...something I can't do. Yet. I am working on a pattern for a fan art Totoro embellishment. I have made a bunch and each time the little guy improves. When I look at my first attempt now, I have to laugh. I don't know how to make this embellishment...but I am figuring it out.)

Saturday, September 3, 2011

Neo the Unicat


Meet Neo. I recently got the chance to help Neo to become a unicorn. Or unicat, I guess. You can see how happy he is about his new hat. His owner, Lisa from the bunnylog, took this awesome picture of Neo. Seriously, this picture has me daydreaming about investing in a camera slightly fancier than the $99 point and shoot camera that I usually use. I love the expression on Neo's face, part annoyance, part patience. "Alright, can you please finish with the pictures so that I can shake my head and get this thing off?"

It funny how sometimes I see a craft someplace and instantly know how to recreate it. And sometimes I see things that are a little bit harder to figure out, and that is a fun process too. This hat was found on etsy from xmoonbloom, but the shop is no longer operating so I couldn't buy the pattern. I ran a search for unicorn cat hat and didn't find anything except a whole bunch of 'borrowed' copies of xmoonbloom's picture on various blogs. But when I just looked for just plain old 'cat hats', I found a pattern and hooked it up. All I needed to do then was devise a little horn and sew it on.

I hear that Neo wore his hat for only a short while. I'm glad Lisa didn't make him wear it if he didn't want to. Making this hat really had me thinking hard about the ethics of 'playing' with cats. 

In college, one of my housemates had a kitten named Nico. That poor cat got way too much love and teasing attention from everyone in the house.  One favorite activity was placing Nico in a paper bag and watching him find his way out. Maybe I am just justifying in retrospect, but he did honestly seem to enjoy the game. We'd all sit around the living room watching him get out and then putting him back in. It was much better than watching the old TV with lousy reception and too many commercials. Nico loved the big rolls of paper that were often lying around the house (lots of Fine Arts majors). He used to climb into the paper tunnels and peek out. Occasionally someone would unroll the paper roll while he was inside, sending him tumbling. I remember one of the guys giving Nico tinfoil shoes which looked pretty cool as he walked around on the carpet, but which slipped out from underneath the poor cat when he stepped onto the linoleum kitchen floor. I wish I could say that I read my housemate the riot act, but I probably just gave a weak, "That's mean." My housemates were all much cooler than I was and I had a hard time sticking up for things like that. I will say though, that Nico didn't run away from us and hide like a lot of cats. He seemed to adore the attention and came running to us whenever there was a crowd in the front room.

Here's another picture of Neo, hanging out with Lisa's daughter (she looks so pretty and mischeivious!) He's sniffing the acorn locket I sent, perhaps thinking, "Well, I may be wearing this silly hat, but thank the lord I don't have to wear a goofy locket!"

Thanks go to Lisa for being willing to share her pictures! Check out her blog if you get a chance, or just leave a comment on this post and I'll make sure she gets the message.


Tuesday, August 30, 2011

Hankie Heaven


My youngest and I ran across an estate sale a while back and met a couple of sisters in their sixties who were selling the crochet, tatting, and embroidery work that their mother had made (along with drifts of other items). I couldn't bring myself to ask the price. If it was a dollar, that would make me sad. If it was a hundred dollars, I wouldn't buy it. But I did have a conversation with the women and mentioned that my children use handkerchiefs instead of tissues. The lady in charge disappeared into the house and came back with an ancient Kraft Caramels box filled with handkerchiefs. She sold 17 hankies, many hand embellished, to my daughter for five dollars. And then she offered her the box as a free bonus.

So here's the question. Do we use the hankies? Yes, we do. They were not doing anybody any good sitting on a shelf in the closet. And every time I wash them or see my children use them, I think of the woman who made them. (The box, on the other hand is displayed in my craft space and will be given back to my daughter when she is old enough to use it carefully.)

I am reminded of Alice Walker's short story "Everyday Use", about a woman who has to decide whether to give her family's heirloom quilts to her worldly daughter (who wants to preserve them), or to her just plain hard working daughter who is going to use the quilts. In the end, she gives the quilts to the daughter who is going to put the quilts to everyday use.

Using things in an everyday way, especially handmade items, puts us in touch with the person who made them. It is a kind of intimacy that we have mostly lost in today's world. Although items become worn with use, sometimes we become curious about how they were made, and learn to make them ourselves. If we hide these things away on shelves, they will be forgotten and the art/craft/knowledge to make them can die.

Or not. There is hope. I love that YouTube has such a stash of instructional videos about creating. You can learn how to crochet, knit, tat, lace, and sew. You can figure out how to build a fort for your kids or a backyard wood-fired oven. You can find out how to make the recipes your grandma made when you were a kid. You can also watch endless music videos and Pokemon hacks, as well as prat falls, babies babbling and 911 calls. Just saying, you know, use your video-watching time wisely.


Saturday, August 27, 2011

Hedgehog


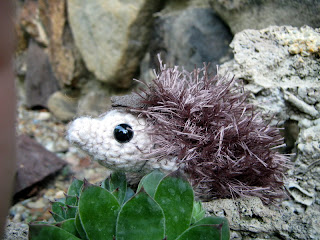
My little sister has always been a collector of animals. When we were young, she was the one who brought home all the strays. My mother encouraged her, and between the two of them, over the years, they have had almost every legal pet you can think of (I'm sure they'd have brought home tigers and bears if they could have). There have been dogs, cats, hermit crabs, fish and lizards, of course. But also goats, a trio of naughty raccoons whose mother was struck by a car, a miniature horse, snakes, rats, mice, guinea pigs, every kind of amphibian you can think of, from newts to tropical poison dart frogs, crickets, and (of course, you've guessed from the pictures) hedgehogs.

Now my sister is married and taking care of a whole new kind of animal--three little girls. She has slowly reduced her pet inventory over the last ten years until now she has only one lovely Bearded Dragon habitat. The dragons crack me up because two are lovely fat preening creatures, but the third was a 'runt' of sorts that was given to my sister as a free bonus with a feed purchase at the annual Reptile Show. Even with a constant supply of gut-fed crickets and meal worms, the little fellow looks like a pale yellow shadow to his tank mates.

Perhaps because of the reduction of pet inventory, or perhaps just because my nieces share their mother's love of a good collection, the stuffed animal section of the family's home is a wonder to behold. At first I was worried that this tiny hedgie might get thrown into the toy box with the larger stuffed friends, but I should have known better. He has been given a place of honor in my sister's room. I think it reminds her of the hedgehog she had in college.
The woodland creatures theme is popular right now. I have seen a lot of cool hedgehog themed stationery, rubber stamps and stuffies. This little amigurumi is my crocheted contribution to the hedge-mania.

If you have any trouble making him, feel free to send me an email or comment on the post. Some of the steps are difficult to describe and I hope I've done it clearly, but I'd welcome the opportunity to clarify if needed.

Meiphemera Amigurumi Hedgehog
(I use an H or I-hook for this.)

Prickles:
Using brown eyelash yarn, ch3, join
R1: 6sc into hole. (6)
R2: 2sc into each ch around (12)
R3: *sc into first ch, 2sc in next ch* total of 6x (18)
R4: *sc, sc, 2sc* total of 6x (24)
R5: *sc, sc, sc, 2sc* total of 6x (30)
R6: *sc, sc, sc, sc, 2sc* total of 6x (36)
R7: *sc, sc, sc, sc, sc, 2sc* total of 6x (42)
R8: sc around (42)
R 9-12: sc6, ch1, turn

Head/tummy:
(I use G or H hook)
chain3, join
sc 6 into hole (6)
sc into each ch around (6)
*sc, 2sc* 3x (9)
sc into each ch around (9)
*sc, sc, 2sc* 3x (12)
R 6: sc6, 2sc, sc, 2sc, 2sc, sc, 2sc (16)
R 7: sc6, 2sc, sc, 2sc, sc, 2sc, 2sc, sc, 2sc, sc, 2sc (22)
R 8: sc around (22)
R 9: sc6, *invisible decrease, sc* 5x, sc (14)
R 10-21: sc 6, ch 1, turn

Place safety eyes into the head, being sure that the tummy is at the bottom.
The sewing process is a little different than most amis because of the two different yarns and two different hook sizes. You will not be sewing each chain to the corresponding chain in the next piece. Instead, sew the pieces together as you would any other kind of fabric; line the two pieces up together and sew regardless of chain spacing.

Step 1: sew the end of the 'flap' on the back to the end of the 'flap' on the tummy. Make sure the head is in the correct orientation. The way I do it is sew from the 'wrong' side, making sure that both 'right' sides are on the inside.

((The next parts are difficult to describe with words. I've made a bunch of these guys and never had the foresight to take a picture of this part. Maybe I'll make another to take pics, but in the meantime, bear with me. Basically, you will be starting at the tail, sewing up along one side to the head, sewing the head ONTO THE BACK ITSELF, and then back down the second side to the tail. This may be obvious and intuitive. Feel free to stop reading here if you have no problem visualizing the rest on your own. )))

Step 2: The 'flap' of the back will need to be sewn to the adjacent curve of the shell, so that for the first few stitches, you will sew back fabric to back fabric. When you get to the tummy section of the flap, you will be sewing the tummy fabric to the back fabric. Keep working along the side of the hedgie until you reach the head.

Step 3: Stuff the head only. DO NOT SEW THE EDGE OF THE HEAD TO THE EDGE OF THE BACK. Position the head onto the back and sew the edge of the head through the section of the back that it touches when the head is placed in a natural position.

Step 4: Sew along the second side, back toward the tail. If you've done it just right, you'll be able to sew tummy to back, stuff the hedgie, then sew the back fabric to back fabric. If you've not done it just right, don't worry, the eyelash fabric you've created is very forgiving. Just sew along the side and stuff, lining it up as you go. Once you've finished, roll the hedgie in your hands to adjust his shape, and you're done!

Feel free to add a little necklace or head bow to your hedgie.

Enjoy! 


Sunday, August 21, 2011

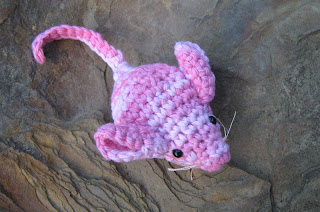
Amigurumi Mouse


Mice are busy little creatures, always rushing from place to place, taking care of themselves. When I was sixteen, and in Germany, my host mother was angry with me. She told me, "Du kummerst dich immer." (Or something to the effect--all these years later, my German is worse than rusty.) I wasn't familiar with the verb, so I asked what kummern meant. And she explained that I was always going from place to place taking care of my business. Which, as an independent kid, I would have taken as a compliment if her tone didn't clearly indicate that it was NOT a good thing. She told me (complete with pantomime) I was like a little mouse, scurrying from place to place, getting things done and not asking for help.

I took it to heart, and for a while I tried to ask for help when I should.

As an adult, I know that I'm not always successful--I tend to assume people are too busy with their own lives to worry about mine, and so I just kummern mich and get what I want done, done. Or, sometimes, not done. I have had this conversation with a friend who is the same way. I've said, "But I want to do this favor for you--I know you need it." But for some of us, it is hard to admit when we need help. And to this day when I see a mouse, I am reminded to slow down.


Amigurumi Mouse Pattern:

ch3 join with slst. slst
Row 1: 6sc into center (6)
Row 2: sc, inc around (9)
Row 3: sc around (9)
Row 4: 2sc, inc around (12)
Row 5: sc around (12)
Row 6: 2sc, inc around (16)
Row 7: sc around (16)
Row 8: sc *2sc, inc* around (21)
Row 9-11: sc around (21)
Add eyes.
Row 12-end: 4sc, invisible dec-->around until closed. (Stuff mouse before closing completely.) Do not tie off. Continue by making tail.
Tail: ch 17. sc into 2nd ch from hook. sc back to body. Tie off. Weave in ends.

Ears: Begin with ch3 join with slst
Row 1: 6sc into ring (6)
Row 2: inc around (12)
Row 3: sc, inc around (18)
Tie off, leaving a long tail. Fold ear in half, then sew onto stuffed mouse.

Whiskers: Use embroidery floss to sew on whiskers. (One strand of embroidery floss=6whiskers)

My son asked me for a grey mouse with no ears and no whiskers--it looks just like a tadpole!


Related Posts Plugin for WordPress, Blogger...